BASIC 10Liners 2018

I recently heard about a contest to write a game in BASIC using only 10 lines. One of the requirements is that it be done on an 8-bit computer. I've been tinkering a lot with my old Tandy Model 102 so I thought this would be a fun project for it.

My original idea was to try to make a very simplified RPG-type game but I just couldn't fit it into 10 lines. Instead I switched gears and recreated a little game I had originally written on my TRS-80 PC-3 Pocket Computer back in the 1980s. My original PC-3 game was a javelin throwing game. Although I had a CoCo 2, my best friend had a Commodore 64 and we played a lot of Summer Games II which was my inspiration. Unlike the PC-4, the PC-3 didn't have any graphics characters built in and there were no bitmapped graphics either, so my program simply alternated printing X and Y as your player moved to sort of simulate running. Then when you hit a different key to throw your javelin the animation changed to moving a dash ( - ) across the sreen until it landed as a slash ( \ ) to look like a javelin stuck in the ground. It was the best I could do on a text-only single line display.

The source code for that game has long been lost so I had to remake it from scratch. I also made some changes from how I remember it, both for the contest rules, and to take advantage of the more powerful computer and larger screen. The Model 102 has two ASCII characters that look like stick figures in slightly different poses so I was able to use those instead of the X and Y of my original. I also changed the game to a long jump instead of javelin throw because with more than one line of text available on the Model 102 screen I could include a jump animation which looks better than my animated dash in the original. But the general gameplay is exactly the same. Basically you hit two keys on the keyboard as fast as possible until your player reaches a line on the screen then you hit another key to throw or jump. The distance you throw/jump is based on the speed you were hitting the keys and how close you were to the line.

There are some pretty amazing entries to the contest so I'm not expecting to place anywhere near the top, nevertheless, I'm pretty happy with the result given I only have 10 lines at 80 characters per line to work with.

The code is availabe on github https://github.com/ksbex/basic-longjump

Screen-Recording-2018-03-06-15-39-21.gif

Frogs

I dislike that fact that I feel the need to post this but I feel it is important even though it will probably go unnoticed. This isn't exactly a high-traffic blog but it's mine and I want to at least have an explanation should the question of my frog logo arise.

Years ago when I started this blog as a self-hosted Wordpress site I was messing with favicons and I was amused by the frog favicon that I still have today. When I moved to Squarespace, I was playing with their Logo maker and decided to add a frog image to my header as well. There is literally no reason for it other than I found it amusing.

Now, years later the Pepe meme has become a symbol of the alt-right and I've been seeing frog emojii 🐸 popping up associated with alt-right twitter accounts and this stupid gabi social network (which I'm sure is a pleasant place to socialize) and it occured to me that my stupid frog logo might be seen as dog whistle or something. So I just want to publicly state that it's not. Sometimes a frog is just a frog.

Bypassing a Proxy Server for a Single Host on OS X When Using PAC file

Recently I wanted to mess around with a little PHP and I needed a quick and easy route to getting a LAMP stack running. Rather than set it all up from scratch, I decided to give Turnkey Linux a try. I downloaded a small OVA file and had it up and running in VMWare Fusion in no time with one catch; I couldn't connect to the webserver from my Mac. SSH was working so I knew the VM was reachable. I disabled the setting for my proxy server and immediately it was working. I had hoped I could just add my virtual host to the "Bypass proxy settings for these Hosts & Domains" box but it turns out that only works for simple proxy configs. The problem is that OS X will ignore this setting if you use a PAC (proxy auto config) file, which we do at my workplace.

Eventually I came with with a little hack to get around it. The PAC file is configured to bypass the proxy for our entire FQDN for our Active Directory domain, so I just created an entry for my virtual machine in /etc/hosts called lamp.my.company.domain.com and I was good to go!

MACXXXXXXXXXX:bin kevin$ cat /etc/hosts
##
# Host Database
#
# localhost is used to configure the loopback interface
# when the system is booting.  Do not change this entry.
##
127.0.0.1    localhost
255.255.255.255    broadcasthost
::1             localhost 
172.16.21.129   lamp.my.company.domain.com
MACXXXXXXXXXX:bin kevin$ 

iOS Photo Management

Serenity Caldwell recently wrote an article titled "I've abandoned my Mac for photo import and editing." which was interesting because I've had a similar experience but for somewhat different reasons. I don't have an iPad Pro so I can't use the Pencil for photo retouching as she does, but I also don't have her aversion to using a trackpad for precision work. I'm comfortable using my trackpad for photo retouching, the fact is though, that I rarely need to do precision photo editing. I mostly just make some exposure adjustments and perhaps a bit of cropping, both of which work very nicely on an iPad. I find it much easier to sit down on the couch with my iPad at the end of the day, pop in my SD card, and import my photos. I can quickly delete the ones I don't want and do minor enhancements on the ones I keep. When I was using my Mac for this, it felt more like a chore so I would put it off for days or weeks before I eventually dealt with it. This meant that when I finally got around to it I had more photos to sift through, which means spending less time actually selecting and enhancing the best ones. Importing smaller batches as I take them actually keeps my photo library smaller and makes the remaining pictures look better.

Serenity's complaints about the added complexity of the workflow for photo management on OS X had never really occurred to me before reading her article. Although she is correct, for the most part it rarely was an issue for me because I am not taking photos for publication. I just dump them into my library, and I'm happy to stick to sorting them by date. However just today I was struck by how bizarrely complicated it is to add a photo from an email directly to my photo library on OS X. An actual photo attachment will let you "Export to Photos" from the context menu but an embedded link to a photo in an HTML email has no option in Mail.app to save the image at all, only to copy it. After copying the email I can use Preview to create a "New from clipboard" image but Preview also lacks a direct export to Photos. So now I need to temporarily save the file on my desktop and the launch Photos to import it, then go back and delete the file from my desktop. On iOS I just long press the photo, tap "Save Image" and I'm done. It's crazy that even if I am sitting at my iMac looking at a photo in an email and the easiest way to save it is to pick up my phone and do it from there.

Configure Windows Screensaver via Active Setup

(Or How Active Setup Execution Order Ruined our Week)

At my workplace we recently were given what appeared to be a very simple assignment; deploy a custom screensaver to a group of machines and make it active. The active screensaver is a user setting and is stored at HKCU\Control Panel\Desktop\SCRNSAVE.EXE. The screensaver was packaged as an MSI but since it had no entry points to trigger a repair of the HKCU registry entries, the repackaging team used Active Setup to trigger the repair for each user that logs on. They’ve done this hundreds of times before and it always works as expected. In fact, years ago, I made a merge module that can be simply dropped into an MSI to run a custom action that automatically creates the appropriate Active Setup Registry keys. So there is almost nothing that can go wrong, until of course it does.

Everything worked as expected for existing users that already had profiles on the machine, but for new users the screensaver was set to none. Everything appeared to be working as expected, Windows Installer logs showed that the repair had happened without errors, but the key was missing for a new user.

Eventually I got involved and did a procmon boot capture to figure out what was happening. It turns out the key was being created as expected, but then was deleted a second later.

procmon log
procmon log

Digging a little deeper into the command performing the RegDeleteValue operation revealed the full command line, %SystemRoot%\system32\regsvr32.exe /s /n /i:/UserInstall %SytemRoot%\system32\themeui.dll, which quickly led me right back to… Active Setup.

Active Setup Registry

It seems the default theme configuration is triggered via Active Setup and it was happening after our screensaver configuration. Google wasn’t very helpful for figuring out if the Active Setup execution order could be manipulated but I did find one clue:

Finally, it is possible to define the order in which Active Setup commands are run - the clues are in the registry so I will leave it to you to figure this out! (Or you can email me…)

Basically, the Active Setup commands are run in the alphabetical order of the entries under Installed Components. Since our merge module automatically uses the MSI ProductCode GUID for this entry, we simply needed to change the ProductCode to something that occurs after {2C7339CF–2B09–4501-B3F3-F3508C9228ED} and we were all set.

Unlock an Active Directory Account Using Mac OS X Directory Utility

Recent versions of OS X integrate well with Microsoft’s Active Directory. As an IT professional working in a primarily Windows-based environment, I can still perform most of my job just fine with a Macbook without resorting to Bootcamp or virtual machines. I do use Jump Desktop for remoting into servers to run Windows-only administrative tools though. One of those tools I frequently need to use is Active Directory Users and Computers. More and more though I’ve been using the native OS X Directory Utility to perform some of the tasks that I previously would have needed ADU&C for. This tool is more like the Active Directory Services Interface Editor (adsiedit.msc) than ADU&C because it presents you with all the attributes of an object without simple GUI buttons for common tasks. But that doesn’t mean it can’t be used for those tasks if you know how.

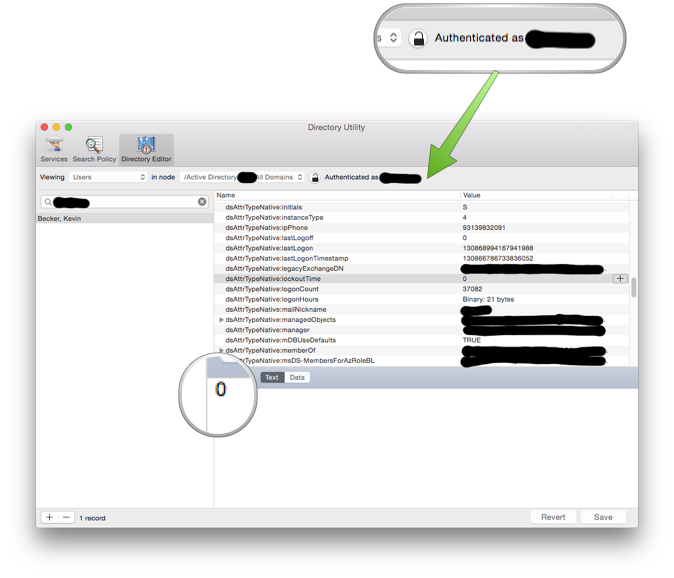
One common situation is unlocking a user’s account after too many invalid password attempts. To unlock an AD account using Directory Utility follow the steps below. Note: the screenshots below are redacted to hide any internal details of my workplace AD environment.

  • Launch Directory Utility(This handy app is hiding in /System/Library/CoreServices/Applications/)
  • Switch to the Directory Editor tab
  • Set the node to your domain rather than /Local/Default
  • Click the lock to authenticate with an account that has the necessary rights. This doesn’t need to be the same account you are currently logged in as.
  • Search for the user in question and then scroll down to the lockoutTime attribute. If this value is anything other than zero, the account is locked out.
Directory Utility
Directory Utility
lockoutTime
lockoutTime
  • Change the lockoutTime attribute to 0 and the user’s account is now unlocked.

Throttle Apple Photos Upload

Apple’s new Photos app was publicly released as part of OS X 10.10.3. It is the replacement for both iPhoto and Aperture. Without getting into an in-depth review, overall my early impression is that I like it a lot but the initial iCloud upload of all your photos is terrible. It will completely saturate your upload bandwidth leaving the internet unusable for other computers on your network. Your only obvious option is to “pause for one day” which will provide temporary relief but constantly starting and stopping the upload for a week or more is a huge hassle.

A better solution would be to throttle the upload so it doesn’t leave your network unusable. Photos, strangely, doesn’t offer this feature but, thankfully, there is a way. User mayall posted a solution to an Apple support community forum. Just download the Hardware IO Tools from the Apple Developer site and you can use the Network Link Conditioner to create a profile that limits your upload bandwidth.

My internet connection is 30 mbps down / 3 mpbs up so I configured my iMac to be able to use the full download speed but only 2 mbps to upload and everything seems to be working well now without my constant need to pause and resume.

Network Link Conditioner

Jump Desktop - Mac OS X Remote Desktop RPD Client

I just wanted to write up a quick endorsement for Jump Desktop. I’ve been using Microsoft Remote Desktop to manage Windows servers from my Mac for a few years now and I finally decided I’d had enough. I looked a little bit at CoRD but didn’t actually even download it to give it a try. It’s strangley blocked by my corporate proxy server, but it didn’t seem to offer much in the way of managing a large number of saved connections so I didn’t bother trying to download it through other means. Instead I found myself settling on Jump Desktop. It was pretty hard to accept the idea of paying $30 for something when I use Terminals for free on Windows but after the initial purchase I haven’t regretted it.

Tagging

One of the best features is that your RDP connections are organized by tags and each can have multiple tags. So I can easily click on the tag group to see all the servers in my lab domain, or I can see a group of domain controllers to see all the domain controllers including both the lab and prod domains. With a good system of tags it’s very easy to find the server(s) you are looking for.

Screen Sizing

It is also much better at dealing with my dual monitor setup than Microsoft’s RDP client. With the Microsoft client, if I didn’t want to run in full screen mode then I was pretty much limited to setting a specific resolution. The selection of resolutions was pretty limited and never seemed sized right because sometimes I’d be using an external monitor and sometimes I’m just running native on my 11" MacBook Air. Jump Desktop always sizes the RDP session correctly to make the best use of my monitor without going full screen.

Conclusion

I don’t have much more to say other than I’m sorry that I didn’t spend the $30 sooner. It makes working on my Mac in a Windows environment so much more pleasant and productive. If you are on the fence then I’d say just buy it. $30 isn’t really much money for something I use every day.

Mac OS X WPA2 Enterprise Authentication Using a Microsoft CA - Part 2

This is the second in a series of posts describing the process of joining a corporate wifi network that uses a certificate from a Microsoft certificate authority with a Mac. There are four primary tasks to accomplish this:

  • Bind the Mac to Active Directory
  • Add the Microsoft CA to the keychain
  • Request a Machine certificate from the CA
  • Configure the wifi network using the certificate for authentication

Part 1 covered the Active Directory binding. Part 2 will cover the other 3 steps.

Trusting the Certificate Authority

certmgr.msc
certmgr.msc

You can request a certificate from a Microsoft CA without actually trusting the CA, however you will have problems trying to use theis certificate for wifi authentication unless the issuer is trusted. There are multiple ways to get the root certificate to trust. If you have a domain joined Windows machine handy then you can go to Start > Run and enter certmgr.msc. Find your corporate root CA under Trusted Root Certification Authorities > Certificates and then right-click and select Export from All Tasks. Note that it will not most likely not be named “Corporate Root CA”, this is just an example. If you don’t know what it is called, look for something with your company’s name in it.

certificate payload
certificate payload

Create another configuration profile to handle the certificate trust. Again, I recommend doing this as a stand-alone profile with a single payload so that it can be updated independently of other settings.

Requesting the AD Certificate

Wifi Profile

Wifi Profile

You will need to combine both the AD certificate request payload and the network configuration payload in the same configuration profile. This is the only way you can select the certificate as an authentication option for the network.

AD Certificate Request

Apple has a KB article describing the AD certificate request. The example shown in Apple’s screenshot did not work for me. Whereas Apple’s example simply has a hostname, I had to fill in a complete URL in the format http://pki.kevinbecker.org/certsrv, as shown below. Figuring out the name of the CA also gave me some trouble. Looking at a certificate that had been issued to a Windows machine it would appear that the name of my company’s CA is “MyCompany Corporate Issuing CA”. At least in my case, this is incorrect. I found the correct name using adsiedit.msc as described in this Microsoft KB Article. You will also need to provide the credentials for an account that has rights to request certificates.

Network Payload
Network Payload

Again, in the same profile that has the AD Certificate payload, you will also have a payload to join your wifi network using that certificate. The Username for connection to the network needs to be the computer name followed by a dollar sign. The computer name can be specified in several places in OS X so it’s important to make sure you use the same name specified in the Sharing Preference pane and when binding to AD. In this example, I’m using a payload variable %ComputerName%. A complete list of payload variables can be found in this Apple KB Article. For the Identity Certificate select the AD Certificate name that you used in your AD Certificate payload.

Troubleshooting

Mike Boylan wrote an article at afp548.com covering this process on Mountain Lion. Following his guide, I still had some challenges, which I’ve tried to detail in this article, but his instructions for enabling logging were very helpful. The highlights are duplicated here:

If an error occurs when requesting the AD certificate, the profile will fail to install. To enable logging for the profile installation, and thus the certificate failure, issue the following commands in the terminal: sudo defaults write /Library/Preferences/com.apple.MCXDebug debugOutput -2sudo defaults write /Library/Preferences/com.apple.MCXDebug collateLogs 1

You will need to log out or reboot for the change to take effect. Logging information will show up in /Library/Logs/ManagedClient/ManagedClient.log. which you can easily view with the Console app. To disable debug logging, delete /Library/Preferences/com.apple.MCXDebug.plist.

eapolclient handles the EAP-TLS negotiation when joining a WPA2 Enterprise network. Errors are logged to /var/log/system.log. You can also enable more verbose logging by issuing the following command in the terminal:

sudo defaults write /Library/Preferences/SystemConfiguration/com.apple.eapolclient LogFlags -int -1

The log(s) will be written to /var/log/eapolclient.[interface].log. To disable the verbose logging, simply change the value to 0.

Mac OS X WPA2 Enterprise Authentication Using a Microsoft CA - Part 1

Getting a Macintosh to join a corporate wifi network that uses a certificate from a Microsoft certificate authority for authentication is pretty easy after Mountain Lion (OS X 10.8) added support for DCE/RPC certificate requests. There are four primary tasks to accomplish this:

  • Bind the Mac to Active Directory
  • Add the Microsoft CA to the keychain
  • Request a Machine certificate from the CA
  • Configure the wifi network using the certificate for authentication

Configuration Profiles

These tasks can all be done using configuration profiles. Configuration profiles are XML files that can be created/edited by hand or through various tools like OS X Server Profile Mananager. You can do this in a single configuration profile if desired, but I recommend splitting these into multiple profiles. By using multiple configuration profiles you are able to more easily make changes and troubleshoot problems that may be profile-related. For example, if all the items are in a single profile and you want to remove the wifi settings, you will also undbind the machine from Active Directory.

Active Directory Binding

Apple has a whitepaper that describes binding a Mac to AD. There is also a KB article describing all the parameters in detail. I recommend using a dedicated profile with a single payload just for the AD binding.

AD Profile

AD Profile

AD Profile General

AD Profile General

In the description field of the general section of all my profiles I include a version number to keep track of profile revisions. You can also require a password to prevent users from removing the profile without authorization.

How you configure the profile will depend on your environment. At a minimum you will need to provide:

  • Server Hostname - Just entering the domain name should let the client find a domain controller on its own. It is not recommended to enter a specific domain controller name as this may change.
  • Username/Password - This is the name and password of an account with rights to join machines to AD. Using default groups this would be at least Account Operator but I’d recommend creating an account just for domain joining machines to the domain that has less rights.
  • Client ID - This is the hostname of the Macintosh. In the example below, I use the naming convention “MAC” followed by the machine’s serial number. %SerialNumber% is a payload variable that will resolve to the serial number of the client the computer it is installed on. Apple has a list of payload variables that are supported.
  • Organizational Unit - The default location for machine accounts in Active Directory is the computers container which is specified by entering “cn=computers,dc=domain,dc=com” however if your organization puts machines into an alternate OU then the format is “ou=foo,ou=bar,dc=domain,dc=com”. Note the syntax difference between the default computers container (cn=computers) and the custom organizational unit (ou=foo,ou=bar).
  • Create mobile account at login - This is not strictly required but it is recommended. If you neglect to create a mobile account at login then the user will not be able to log in when not on your corporate network.
Directory Payload

Directory Payload

Other settings worth noting in your AD binding profile are under the Administrative tab. Here you can add additional usernames and/or groups that are automatically granted administrative rights on your Macintosh machines. By default the default Active Directory groups enterprise admins and domain admins are included. It is also worth noting that the namespace defaults to domain which may create some naming issues with your mobile accounts. With the namespace set to domain, local user profiles are created in /Users/DOMAIN\userid/ , which has a backslash in the folder name. In general, this is a valid character but some apps (Powerpoint, I’m looking at you!) may not work well with files in the user’s home directory when named this way. It’s also just generally unpleasant and awkward to work with. Changing the namespace to forest will result in mobile profiles in the format /Users/userid/ which is counterintuitive, but nevertheless the desired naming convention.

Administrative Tab

Administrative Tab

Part 2 covers the rest of the process.